
How To: Maternity Jeans (Tutorial)
Almost two years ago, I broke the zipper on a pair of my jeans (I've never done this before or since, happily), and I thought, "WHAT could you possibly do with a pair of jeans with a broken zipper?"
And then I remembered that I'd made myself a pair of maternity jeans once upon a time, and this pair might be a chance for me to do it again, now that I knew a little better what I was doing.
So I stashed them away for many many months until I was pregnant again.
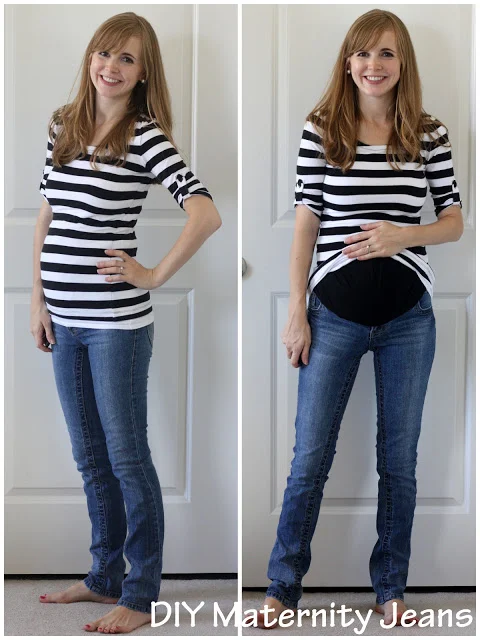
And then after I made them, I bought these maternity jeans from Old Navy for a whopping $13 and they came and I loved them and I thought, "Who would ever choose maternity pants with a panel that goes over your stomach when the low elastic waistband is so much better?"
I'll tell you who - me. Because although I loved that low waistband, by the last eight weeks of pregnancy, I was carrying so low that my stomach was constnatly pushing my pants down AND it was hard to find shirts long enough to cover my stomach, so I suddenly found myself turning to my previously unloved homemade panel maternity jeans.
Whew, why do I always have so much to say before I get to the actual point? Do I think anyone REALLY needs that much back-story (no, but I can't help myself).
Either way, it was really pretty simple to make these and since I already had the jeans AND a hole-y tank top, it cost me about $2 for elastic and nothing else. Beat THAT, Old Navy.
Supplies needed:
- Jeans
- Stretchy t-shirt or tank top (the stretchier and thicker the better).
- Elastic (I used one about 1.5 inches thick)
- Your usual sewing supplies: sewing machine, thread, pins, scissors
I struggled with my
because they kept slipping down - I did two things to counteract that on this pair. First, I didn't cut the back at all - I left the entire back waistband intact. Second, I put elastic at the top of the stretchy fabric to help hold them up. Full-length denim is just too heavy for the jersey to keep up on its own.
Lay out your jeans out flat. This is a very difficult step. . .

Carefully cut a half circle that gets rid of most of the zipper, the metal rivets at the top of the pockets (I didn't do this last time and broke my needle when it hit one of them), and the front belt loops. Don't cut any lower than you have to, because the lower you go, the longer the shirt you'll need to cover your stretchy fabric.

Turn your shirt or tank top inside out and slide it down over the top of your jeans (so your jeans are inside the tank-top) as far as it will go.

Pin the tank top along the half-circle cut out you made on your jeans.

Cut away the top of the tank or shirt so that it lines up with the edge of your jeans all the way around.

Using a tight zig-zag, sew the two pieces together all the way around the opening (where you've pinned and then around the backside too).
Remove your pins and ta-da! Maternity jeans.
But maternity jeans that will probably slide down every ten seconds. Very bad. Let's add some elastic.
Try your jeans on and pull the tank/shirt part up as far as it goes. Mark about two inches above where you want them to hit on your stomach (if you're making them early in your pregnancy, be a bit generous).
Take the jeans back off, and carefully cut off the top off the shirt where you marked.Turn your pants inside out.
Fold the top edge of the shirt over about 1.75 inches (if you're doing 1.5 inch elastic. If you're using a different thickness, adjust appropriately).

Pin it in place, and carefully sew shut with a small zig-zag stick all the way around, leaving a three inch opening on one side so you can insert the elastic.
Wrap your elastic around the top of your stomach and cut to your desired length, leaving an extra inch.
Pin one end of the elastic at the opening, thread the elastic through and then overlap the two ends and sew them securely together.
Sew shut the opening and trim any loose threads.
Enjoy!
